I did it! My first top!

So, having finally remembered how to use my machine, I decided to bite the bullet and try my hand at making an item of clothing. First decision was what to make. I have a stash of patterns I’ve collected from sewing magazines but I’ve never tried making any of them. Most of them are dresses and I decided I wasn’t quite ready to tackle zips or anything yet. Plus I really wanted to make something with what I had on hand.
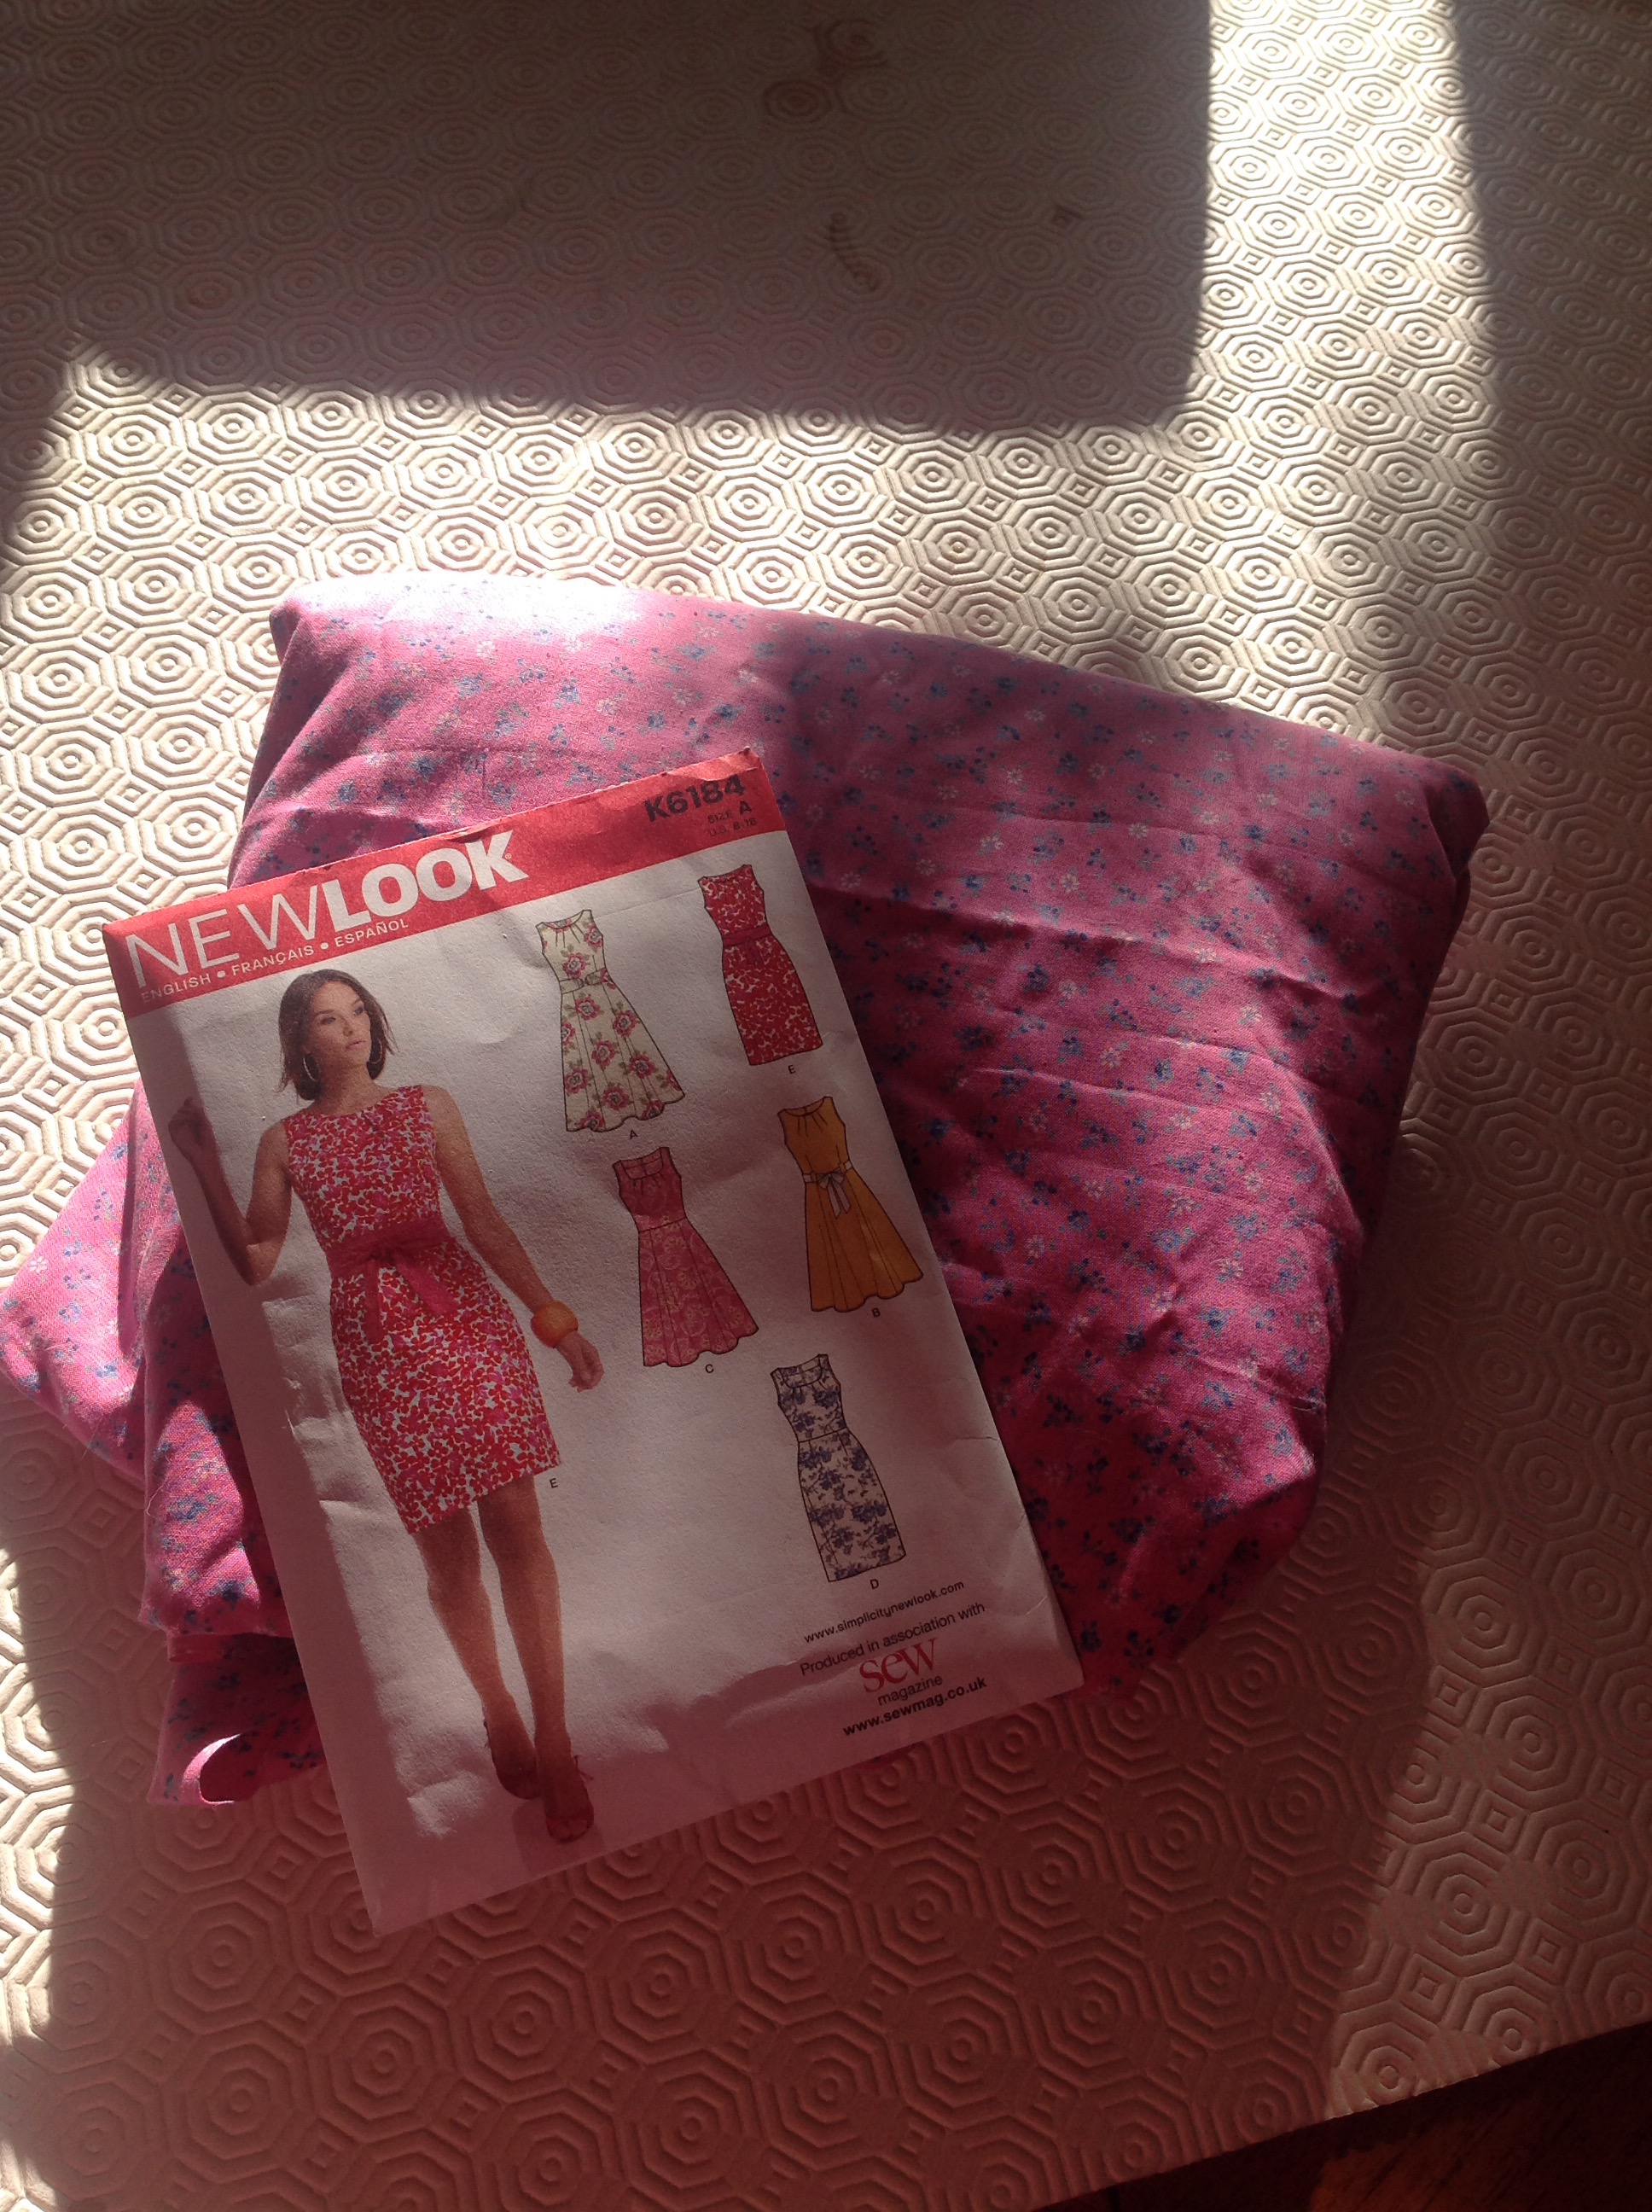
So I dug this out:

20200506_134221.jpg

I was given this as part of my Christmas present a few years ago (thanks Mum and Dad), but had never done more than flick through it and imagine what I could make. After looking at the different projects, I decided to start at the beginning – the Sleeveless Shell Top. I figured it would be a good piece to start with as it included:

  • Only four pattern pieces
  • A simple button/loop fastening at the back
  • No sleeves to worry about
  • No bias binding – the neckline and armholes are finished with the facing

Seemed all good. Then I got the pattern sheet out… I mean – what on earth is this?!?

20200414_1536495822877829003077868.jpg

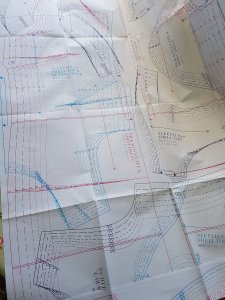
Terrifying! It looks more like a blue print for a house or something.

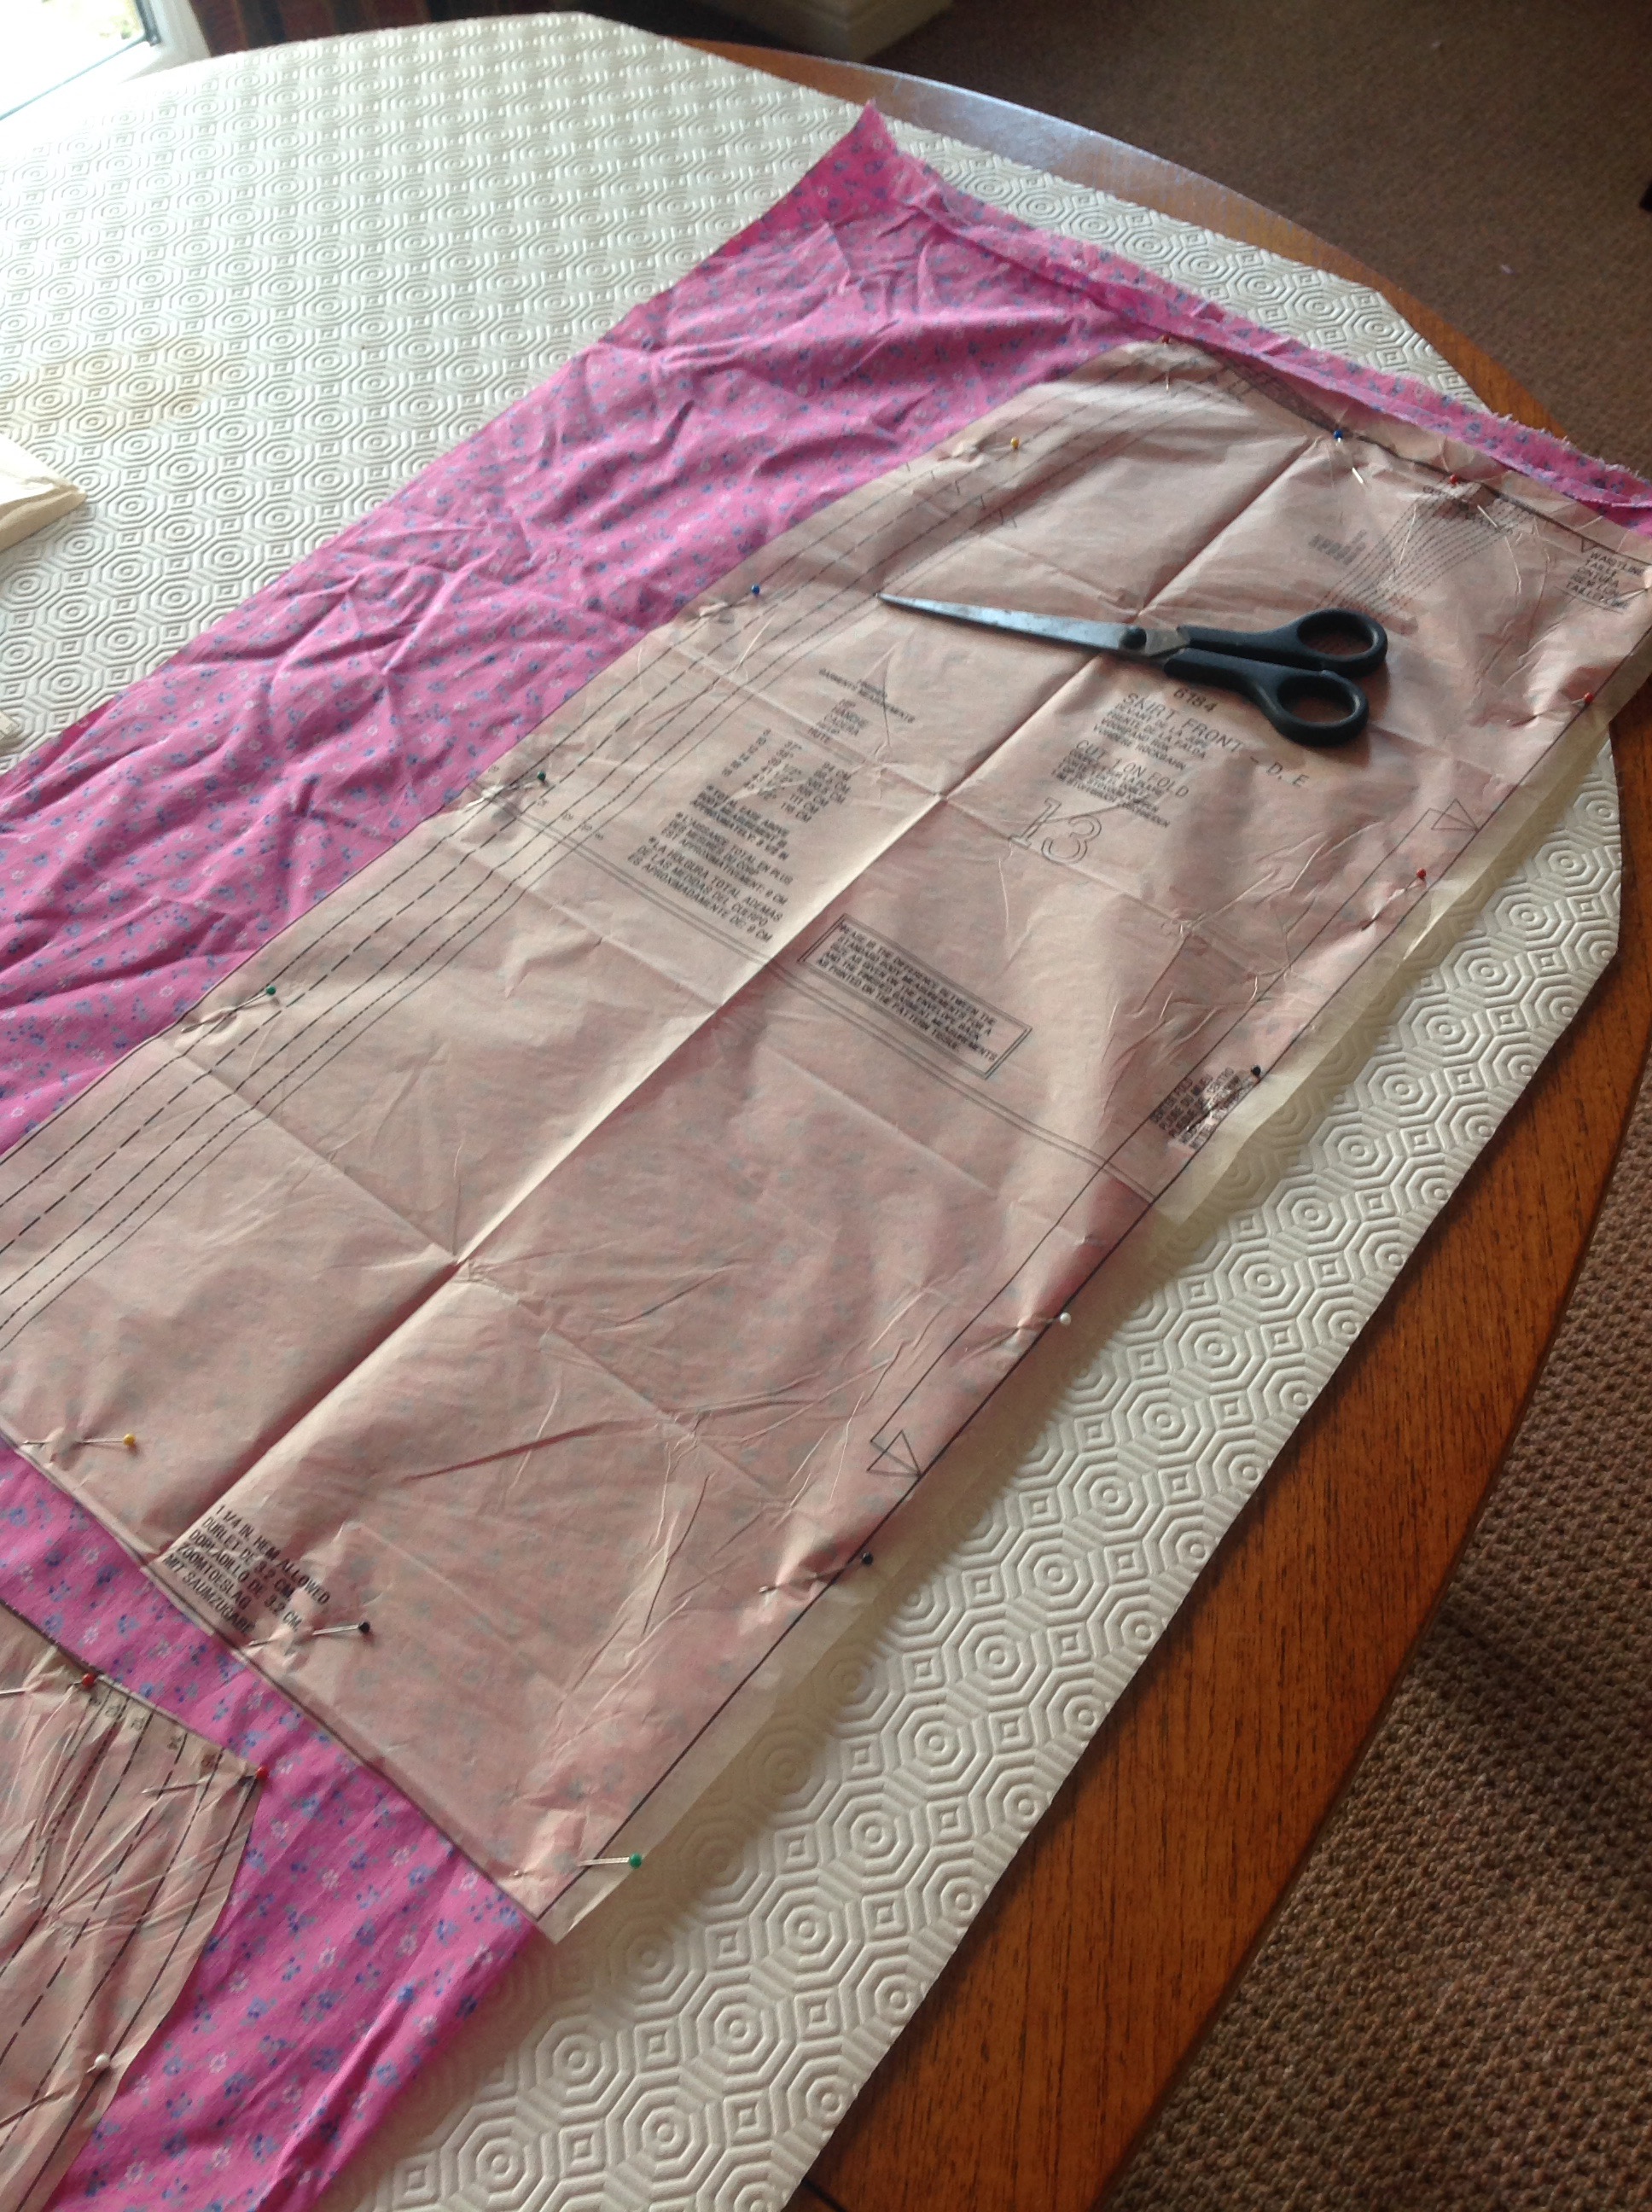
Once I’d calmed down from my initial panic, I figured out which bits I needed and got tracing. After looking at the measurements I decided I needed to combine two sizes, so read May’s instructions on how to do that (which I think I managed ok).

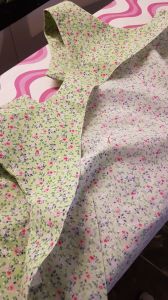
Pattern ready to go, I got my fabric out. Unfortunately, I didn’t have enough of the fabric I’d hoped to use, but I had a back up ready. Until I had two metres of fabric out on my kitchen table, I thought it was a decent size. Turns out oval tables aren’t ideal for laying out and pinning patterns, but I got there in the end (yes I could have used the floor, but this one would have tried to “help”…).

20200421_1923423162555236589385297.jpg

Anyway, I got everything cut out ready to start. Thanks to my Sewing Guru (aka Mum), I knew how to transfer notches and to use tailors tacks for darts, so that bit wasn’t too daunting. I was ready to start!

At this point I should make it clear that it took around three days for me to get to this stage, making sure I’d cut everything out properly and that I’d got the grainline straight etc. It then took another couple of days before I was brave enough to remove the pattern paper and actually start sewing…


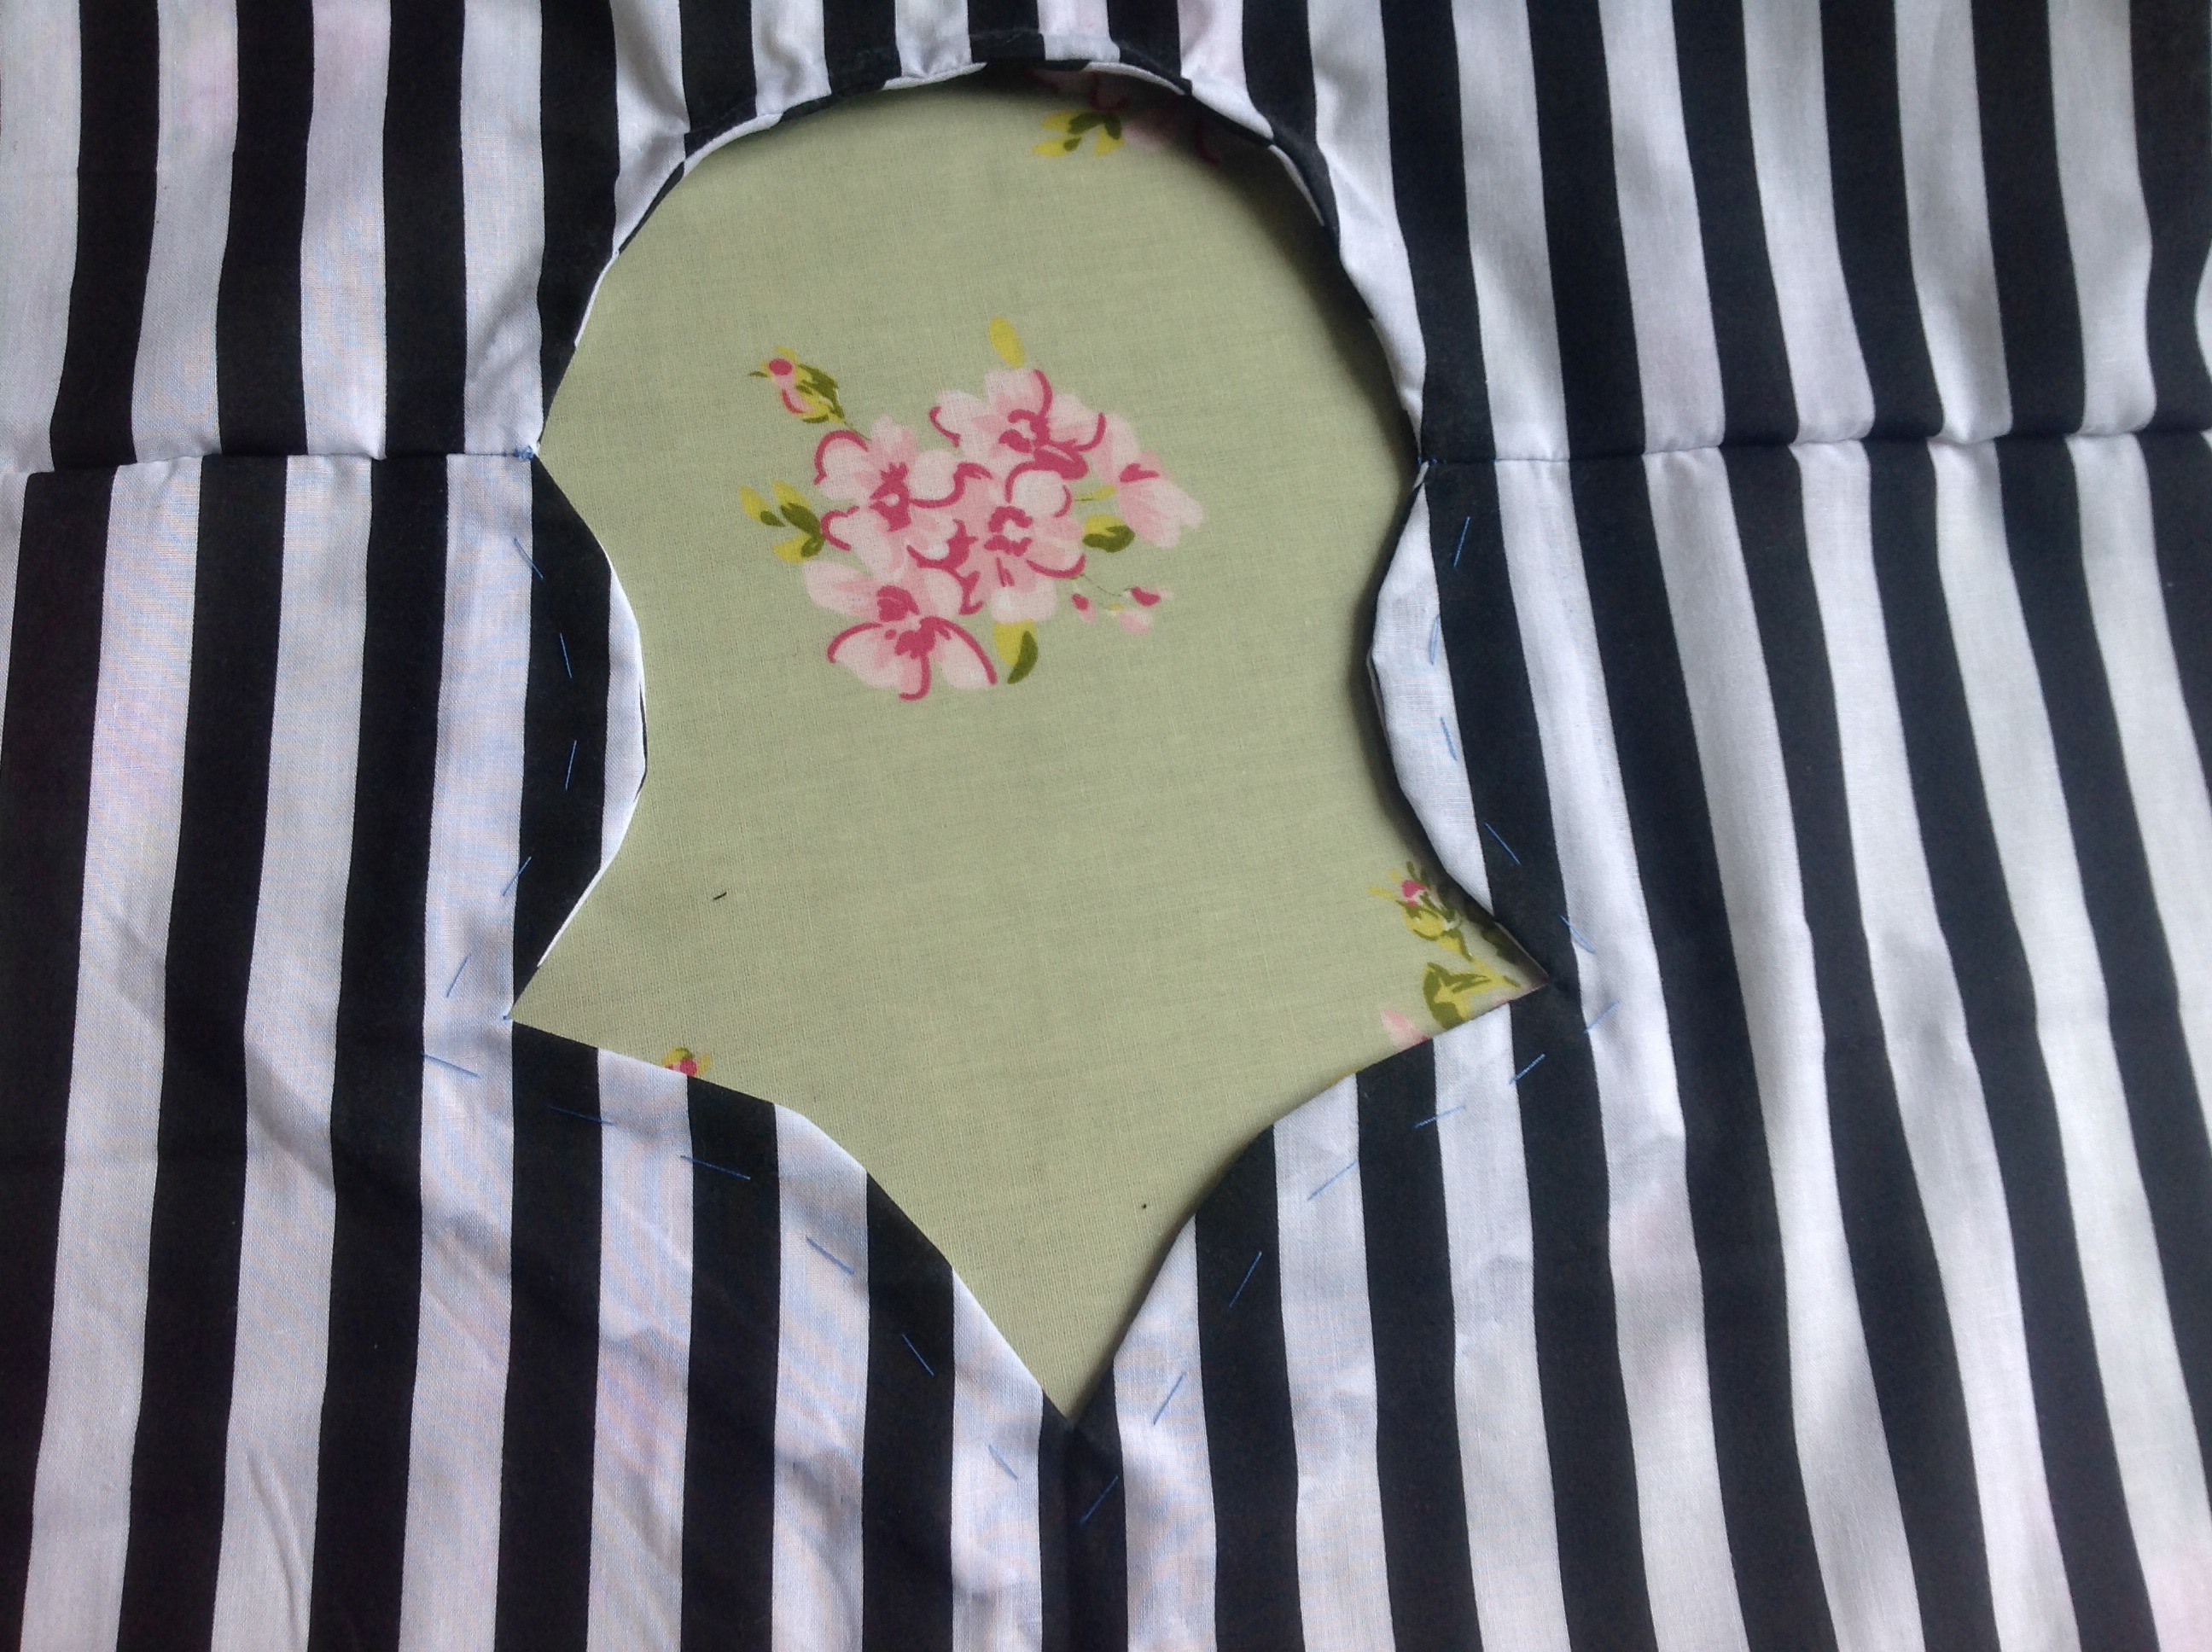
First job: staystitching the neckline. I’d never done this before, but it was fairly straightforward so no problems here. Then came the interfacing…

This should have been simple, especially as I’ve used interfacing before, but could I remember what I’d done? No…

Do I cut it to shape then attach? Or do I fuse the pattern pieces to the interfacing, then trim around them? I couldn’t for the life of me remember and a phonecall to the Sewing Guru wasn’t masses of help (“I think you can do it either way”). In the end, I cut the interfacing nearly to size with the pattern pieces, then trimmed once I’d fused everything together. Seemed to work ok, but any suggestions welcome. At least I didn’t get anything stuck on the iron (which I was worried about, to be honest).

Next up was darts. I felt more confident with these. I’ve done them a couple of times now, even if I’ve not finished the items they were part of. After that was shoulder seams, on both the outer top and the facing. Again, relatively simple – short, straight seams with straight stitch. Nothing to worry about there.

Then came the instruction “neaten the seams”. Not done this before but, following a quick check of the book, I now know how to do this. I used the zig-zag stitch option, with mixed results. I think I need to practice using my zig-zag stitch much more as I haven’t quite got the hang of it or of how close to go to the edge. It was fine to start off with but then I couldn’t quite get the tension right on later seams, even after a Skype conflab with the Sewing Guru.

Once I’d neatened the shoulder seams and the edges of the facing, it was time to attach the facing to the top at the neckline. I managed this without too many problems and wasn’t too fazed by clipping the seam allowance so it all sat flat.

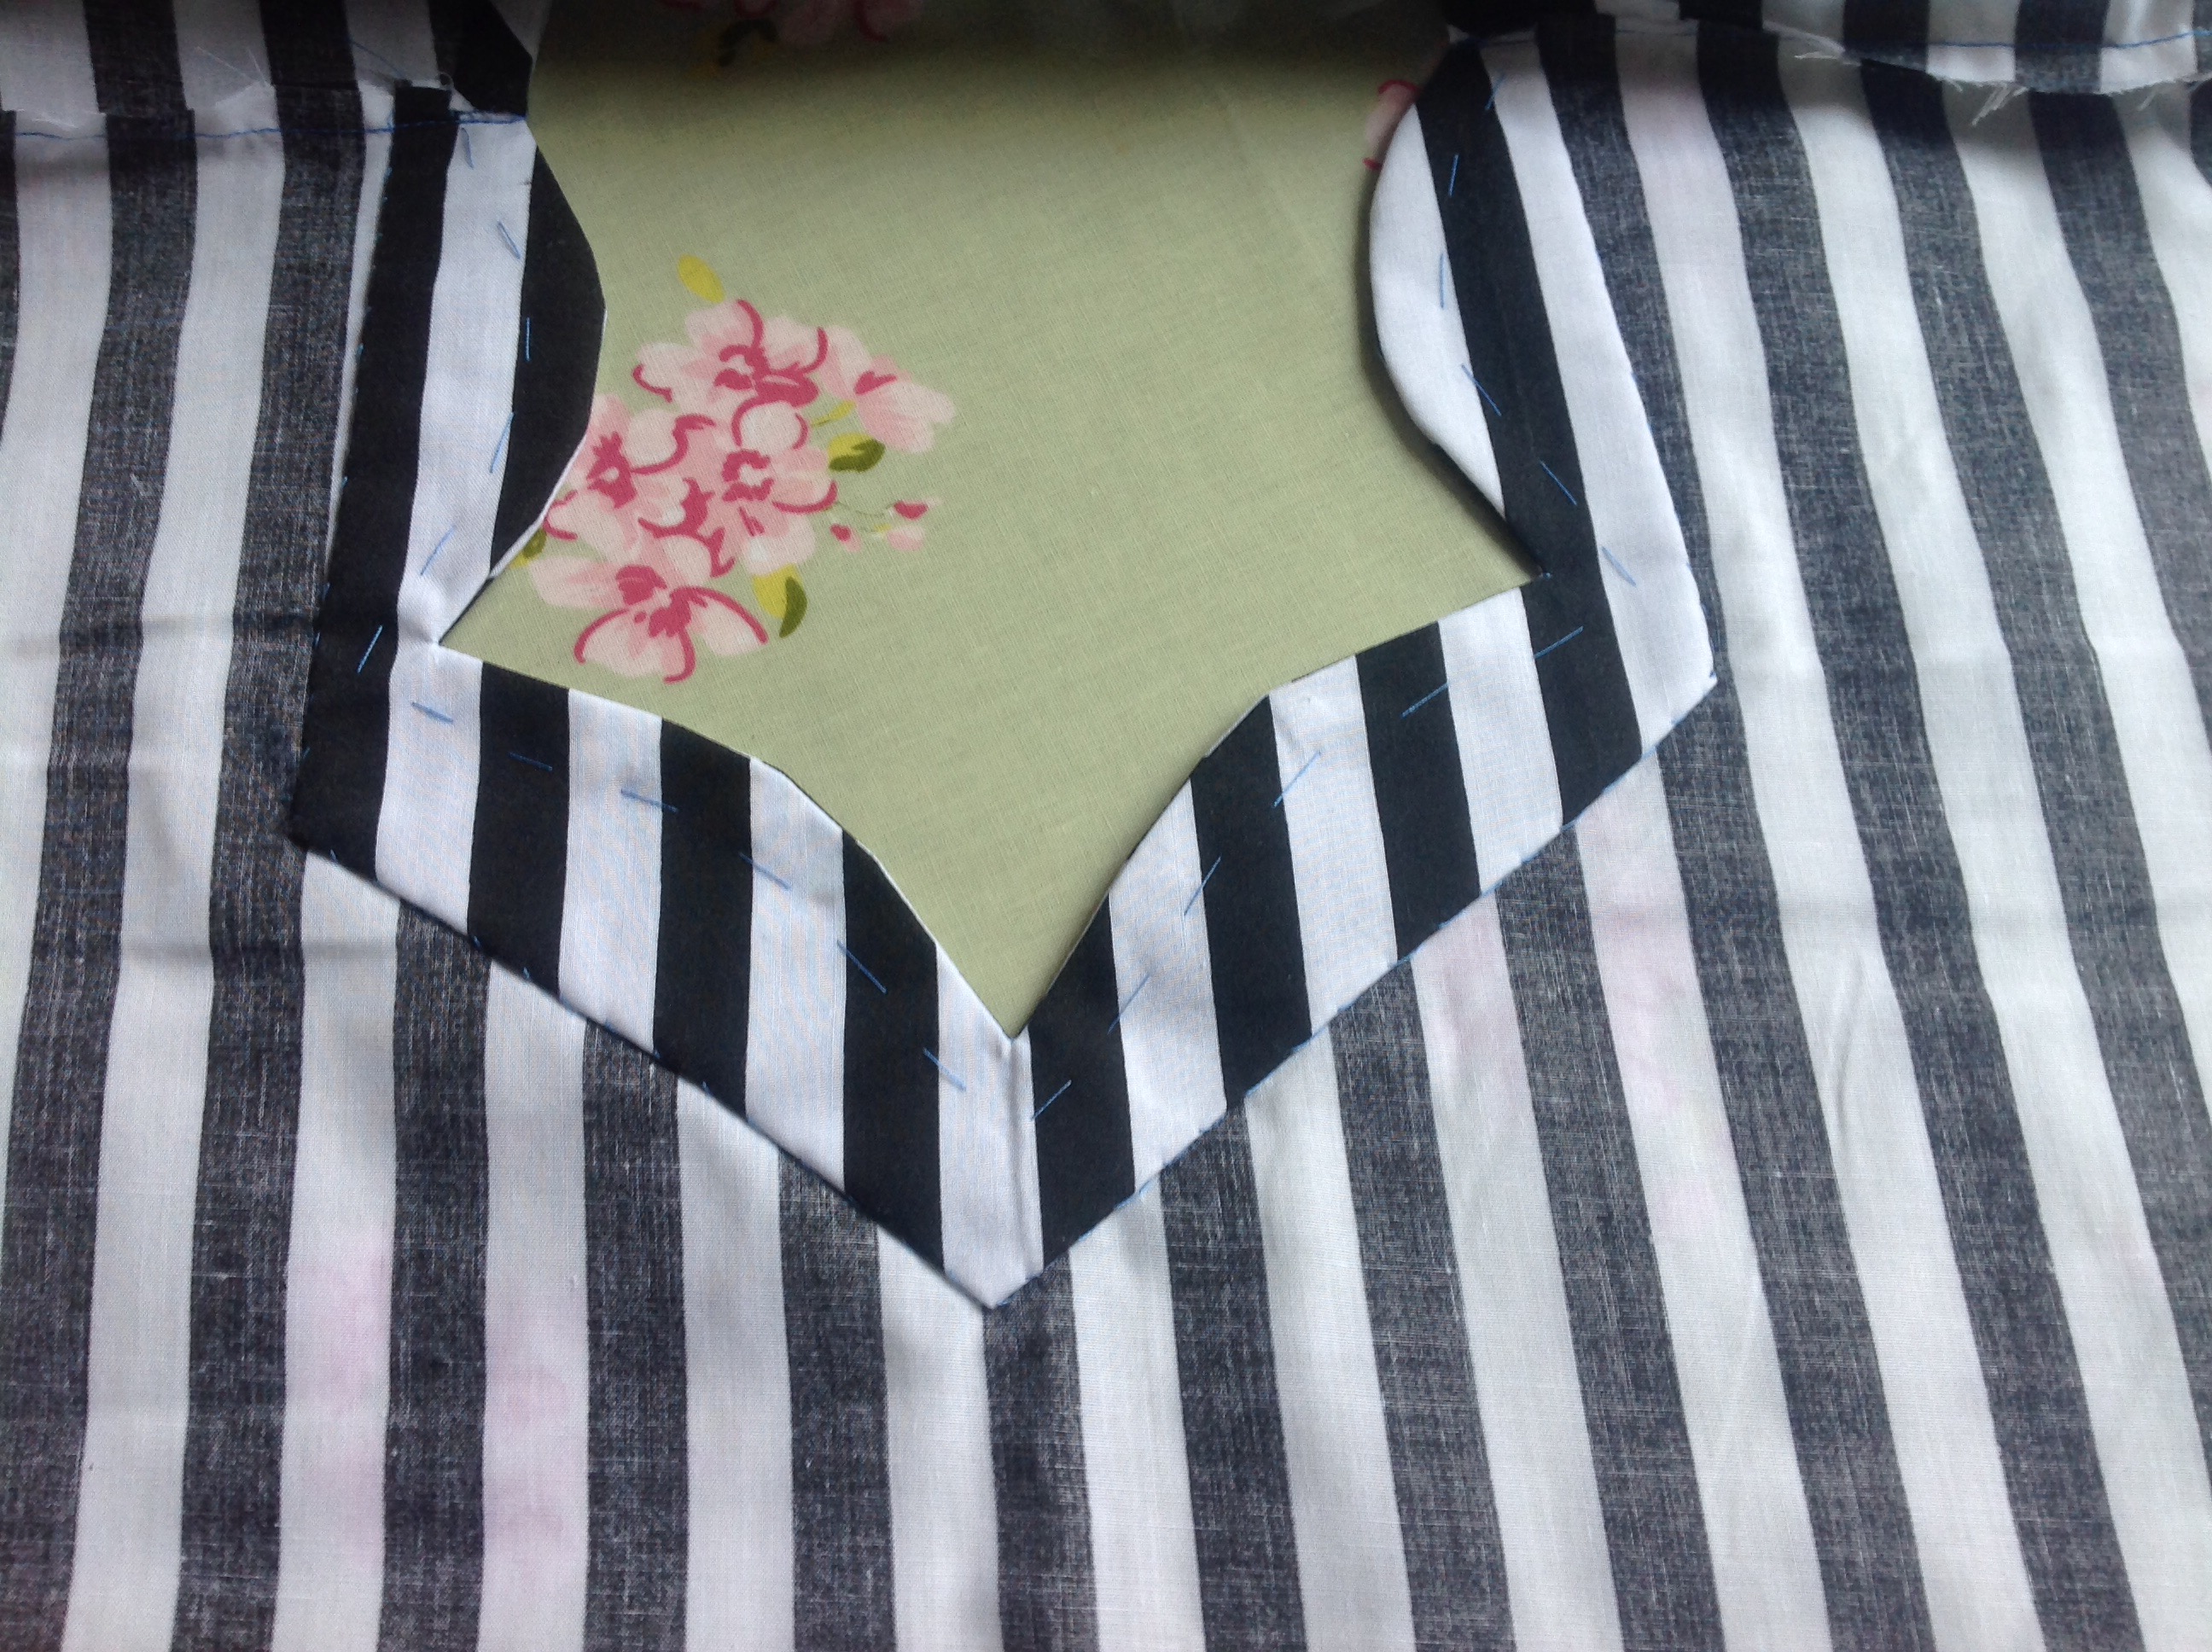
Then came another new term – understitching. This turned out to be quite tricky – not helped by my thread running out partway along a seam that was going perfectly. But I got there in the end – thank heavens for quick unpickers.

After attaching the loop, it was time to attach the facing at the armhole and centre back. Again not too complicated, so I managed this without too much trouble. But then came the big moment – turning the facing through.

This would be when the top would really start to take shape. At this point, the diagrams in the book were more helpful than the instructions. I didn’t have a safety pin to hand but managed without too much trouble. I actually had something that looked like a top!

IMG-20200429-WA0006.jpeg

At this point, it was relatively smooth sailing. Two straight side seams and one straight seam down the back. Pinning this properly was the biggest challenge. I was paranoid about my notches and seams not matching up so I put a pit either side of those to stop them shifting, then eased the rest of the seams together. Other than the seam neatening issue I mentioned above, sewing these seams wasn’t too much trouble.

In the book, it says to machine stitch the hem, but with the issues I’m having with zig-zagging I’ve decided to hem by hand. I’m more confident doing it that way and I know I can do a good job (if a slow one).

So there it is – a finished top (well nearly)! I don’t think it looks too bad. What do you guys think?

My finished top.

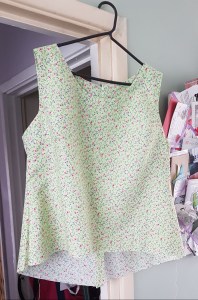
I’m partway round on the hem and have a button to sew on, but I was so proud of it, I couldn’t wait to share.

Back with a bang!

Last night saw the much anticipated return of the sewing bee. This is always one of the highlights of my year. The show is what inspired me to start sewing and each episode gives me new ideas for things I could make. And the new series seems to be no exception…

Returning to the sewing room is like reuniting with old friends, even though we’ve not yet met any of this year’s sewers.

This week’s (this season’s) first challenge is wrap skirts. As usual, while the sewers rummage through the stacks of fabric my initial thought is “I want the haberdashery”. Am I alone in this? To just pick up a pattern and be able to choose from such a range of fabrics there and then would be amazing.

Incidentally, have the desks/sewing stations always been different pastel colours? I’ve never noticed it before…

The finished skirts range from beautifully made (Therese’s, Ali’s and Peter’s really stood out to me) to a little messy (though I don’t think I’d have like Nicole’s even if it had gone perfectly – shiny and gold’s not my thing). It’s still a little early to tell much about our sewers yet though.

Next up is the transformation challenge (I still think of it as the alteration challenge). I think this is the part of the show where you can see the biggest change between now and the early season’s. In the first season they were given a specific task to do (change the neckline of this top, add some patch pockets on this skirt etc) and they were judged on execution as well as the difference they made to the garment. Over the seasons, this has shifted to more and more radical transformations. Sometimes I like the end results, sometimes I’m less impressed – although it’s always fun to see what everyone comes up with.

Taking two men’s shirts and creating an item of women’s clothing should sound bonkers, but having seen some of the previous transformations, nothing surprises me any more. I quite like the idea of trying this, but as Boyfriend only as two shirts total, cutting them up might not go down well…

Not sure I’d have ranked them exactly how the judges did (Liz and Therese’s were my favourites), but I’ve seen a lot of negative comments online about Peter’s dress. Now, while it might not be to my taste, I can appreciate the skill, creativity and amount of work that went into it. Yes, there was sewing involved. You actually saw him with a needle and thread. He may have draped it on the dummy to get the shape but then he sewed everything into place, just like we saw with Chinelo (sp?) a few years ago.

Right – rant over. On to made to measure. As I said in my last post, this is always my favourite challenge and where we finally get to see a bit more of who the sewers really are. My personal favourites were Liz’s (again), Therese’s (spot a pattern yet?) and Clare’s. Matt’s was very pretty and well made but I wasn’t keen on the fabric.

I’m not going to spoil who’s left and who got garment of the week, but here are my initial thoughts on each sewer so far:

  • Alex – his skirt could have been ok if he’d not got flustered and done the buttons wrong. Really wasn’t keen on his pattern or fabric choice for the tea dress, and he made quite a few mistakes. Hopefully it’s just nerves… But he definitely had on his best ballroom smile!
  • Ali – good, competent sewer. I liked some of her style choices and everything was well made. Being a paramedic she should cope with the stress well.
  • Angillia – felt a little like she was out of her comfort zone. She can obviously sew well (as shown in her tea dress) but not sure how well she’ll cope with time pressures.
  • Clare – love the vintage style! I really like her tea dress but she didn’t seem as confident on the pattern challenge and her transformation looked a little messy in places. Again, could be first week nerves…
  • Fiona – a little bit feisty at times (accusing Patrick of stretching her skirt!!! 😂). Wasn’t really keen on the feathers and her tea dress wasn’t finished, which is never a good sign.
  • Hazel – I liked the fork truck! She seems like a strong competent sewer but for some reason didn’t stand out. Maybe it’s just different taste in fabrics etc.
  • Liz – I like her slightly quirky style, plus she seems to be able to sew well. Like the corset-style top in the alteration challenge and loved her tea dress. (She also kinda reminds me of Kate Kane from Batwoman!!!)
  • Mark – my local sewer from Kenilworth! Plus he gets bonus points for the cute dog. Another one with a vintage-y style, and again, seems to be able to sew. And he appreciates the value of pockets! Always good.
  • Matt – love the title of Drag Designer in Chief!! He made an extremely good tea dress, but I wasn’t as keen on his skirt or transformation challenge.
  • Nicole – definitely made the wrong choice of fabric with her skirt and it’s never a good idea to not listen to the judges advice. She’s very distinctive but I think we have very different tastes.
  • Peter – he literally bled for his art – showing it’s not just me who can injure themselves sewing… He had two very strong challenges and I quite liked his tea dress, even if I wouldn’t wear it. He does need to work on his fitting though…
  • Therese – as you can tell from what I’ve written above, I think she could’ve one to watch. She’s obviously got a lot of skill and I adored her tea dress!

So, to sum up my current top pick are Liz, Therese, Peter and Ali. I can’t believe I now have to wait a while week for the next episode!

Oh well, off to see if I have any patterns for tea dresses…

Back to the beginning…

Tonight sees the return of the Great British Sewing Bee, so I thought it would be a good time to go back to where it all started: Season One.

On 2 April 2013, the first episode of this quirky little show aired on BBC2. I’m not sure anyone really knew what to expect or whether it would work. Would an hour of watching people really make for interesting TV?

The answer – at least for me – is a resounding yes!

Repeats of the first series started airing on Really last week, or on the Dplay app if, like me, you only stream things now. Perfect timing to get me in the mood for the new series.

As soon as the music starts, I’m smiling. It almost feels like coming home. Time to settle in…

As we enter the sewing room for the first time, I can see sewers I recognise, and a few that I appear to have completely forgotten. There’s Patrick and May – I miss May! Don’t get me wrong, I like Esme, but May’s like the Mary Berry of sewing, she’s just a bit more approachable and seemed to focus more on technique.

The first challenge is an A-line skirt. Relatively simple – not too many pattern pieces, a couple of darts and a zip. I feel like I might manage this one (emphasis on might). I’ve done darts before but zips quite frankly scare me.

During the challenge we get to know the contestants a little more. Some, like Sandra, Ann and Tilly, I recognise immediately. Jane and Michelle I seem to have forgotten completely, which doesn’t bode well. I think I remember Lauren, but I coul she mixing her up with someone from another season.

I have to say, I’m so jealous of how much space they have to cut out. Such a dedicated space is so different from hoping my folded fabric will fit on the kitchen table (I haven’t dared cut on the floor yet – might be tricky with wolfhound laid on your fabric).

(Side note: I love Tilly’s top, I keep getting distracted by wondering where I can find something with those sleeves. I’m also bobbing my head along to the music as I watch)

I love how different the eight skirts are. I think this is what got me interested in sewing right here, how people can take the same pattern and just take it in completely different directions.

The alteration challenge here is one of the most simple seen across the series – I think they were still feeling their way at this point. Still, varied success with the results. Sandra and Mark made a pig’s ear of it and Jane’s fringing is… different… Let’s leave it there.

(Side note 2: Do we think Ann’s capable of doing anything less than impeccably?)

On to the made to measure challenge, these are always my favourite. There’s more time for them to do something more complex and you get to see more of their personalities. Plus, I’m in awe of anyone who can make stuff for other people. I’m still grappling with making clothes for myself.

I vaguely remember some of these dresses and the designs are shown on screen (that reversible dress).

Wait – man down! Jane’s been taken ill. Who remembered there was this much drama in the first episode? Poor Jane. At this point, I can’t remember if she makes it back.

Looking at the final dresses you can start to see people step away from the pack – and not all for good reasons. Michelle obviously attempted too much and Lauren’s is way too snug – can the poor girl breathe? I like the look of Mark and Tilly’s dresses. Ann and Sandra’s are obviously well made, but I’m not as keen on the styles.

It’s not a massive surprise who leaves, though I think Stuart had a lucky escape. Hope he does better next week.

All in all, it’s been nice to go back to the first episode. There was so much I’d forgotten. I definitely think there’s been a shift more towards design rather than technique in more recent series, but I guess things can’t stay still. It will be interesting to see how it compares to the new series.

I’ll end with my favourite quote from the show, courtesy of Stewart:

I’ve never made a skirt before Claudia – let alone an A-line!

And said with such attitude!

Enjoy the new series everyone!

Getting back into the swing of things…

Hi everyone, long time, no see…

Over the last couple of years, I’ve not really sewn very much – partly because life’s been a bit busy, and partly because I was a little worried about how this sweetheart would react to my sewing machine (she’s not really a fan of loud noises)…

Large grey dog curled up in armchair

A snoozy Luna-pup

This is Luna. She’s half Irish Wolfhound, quarter Great Dane, quarter Standard Poodle and 100% adorable, giant fluffball. She’s just about to turn three & I’ll admit that cuddling/playing with her and her “big” sister Lyra has taken priority over sewing.

However, last week I decided I wanted to get going again. So I started rummaging through my stash of sewing/craft stuff and looking for a good project to help remind how to actually use my sewing machine again.

Sewing materials laid out
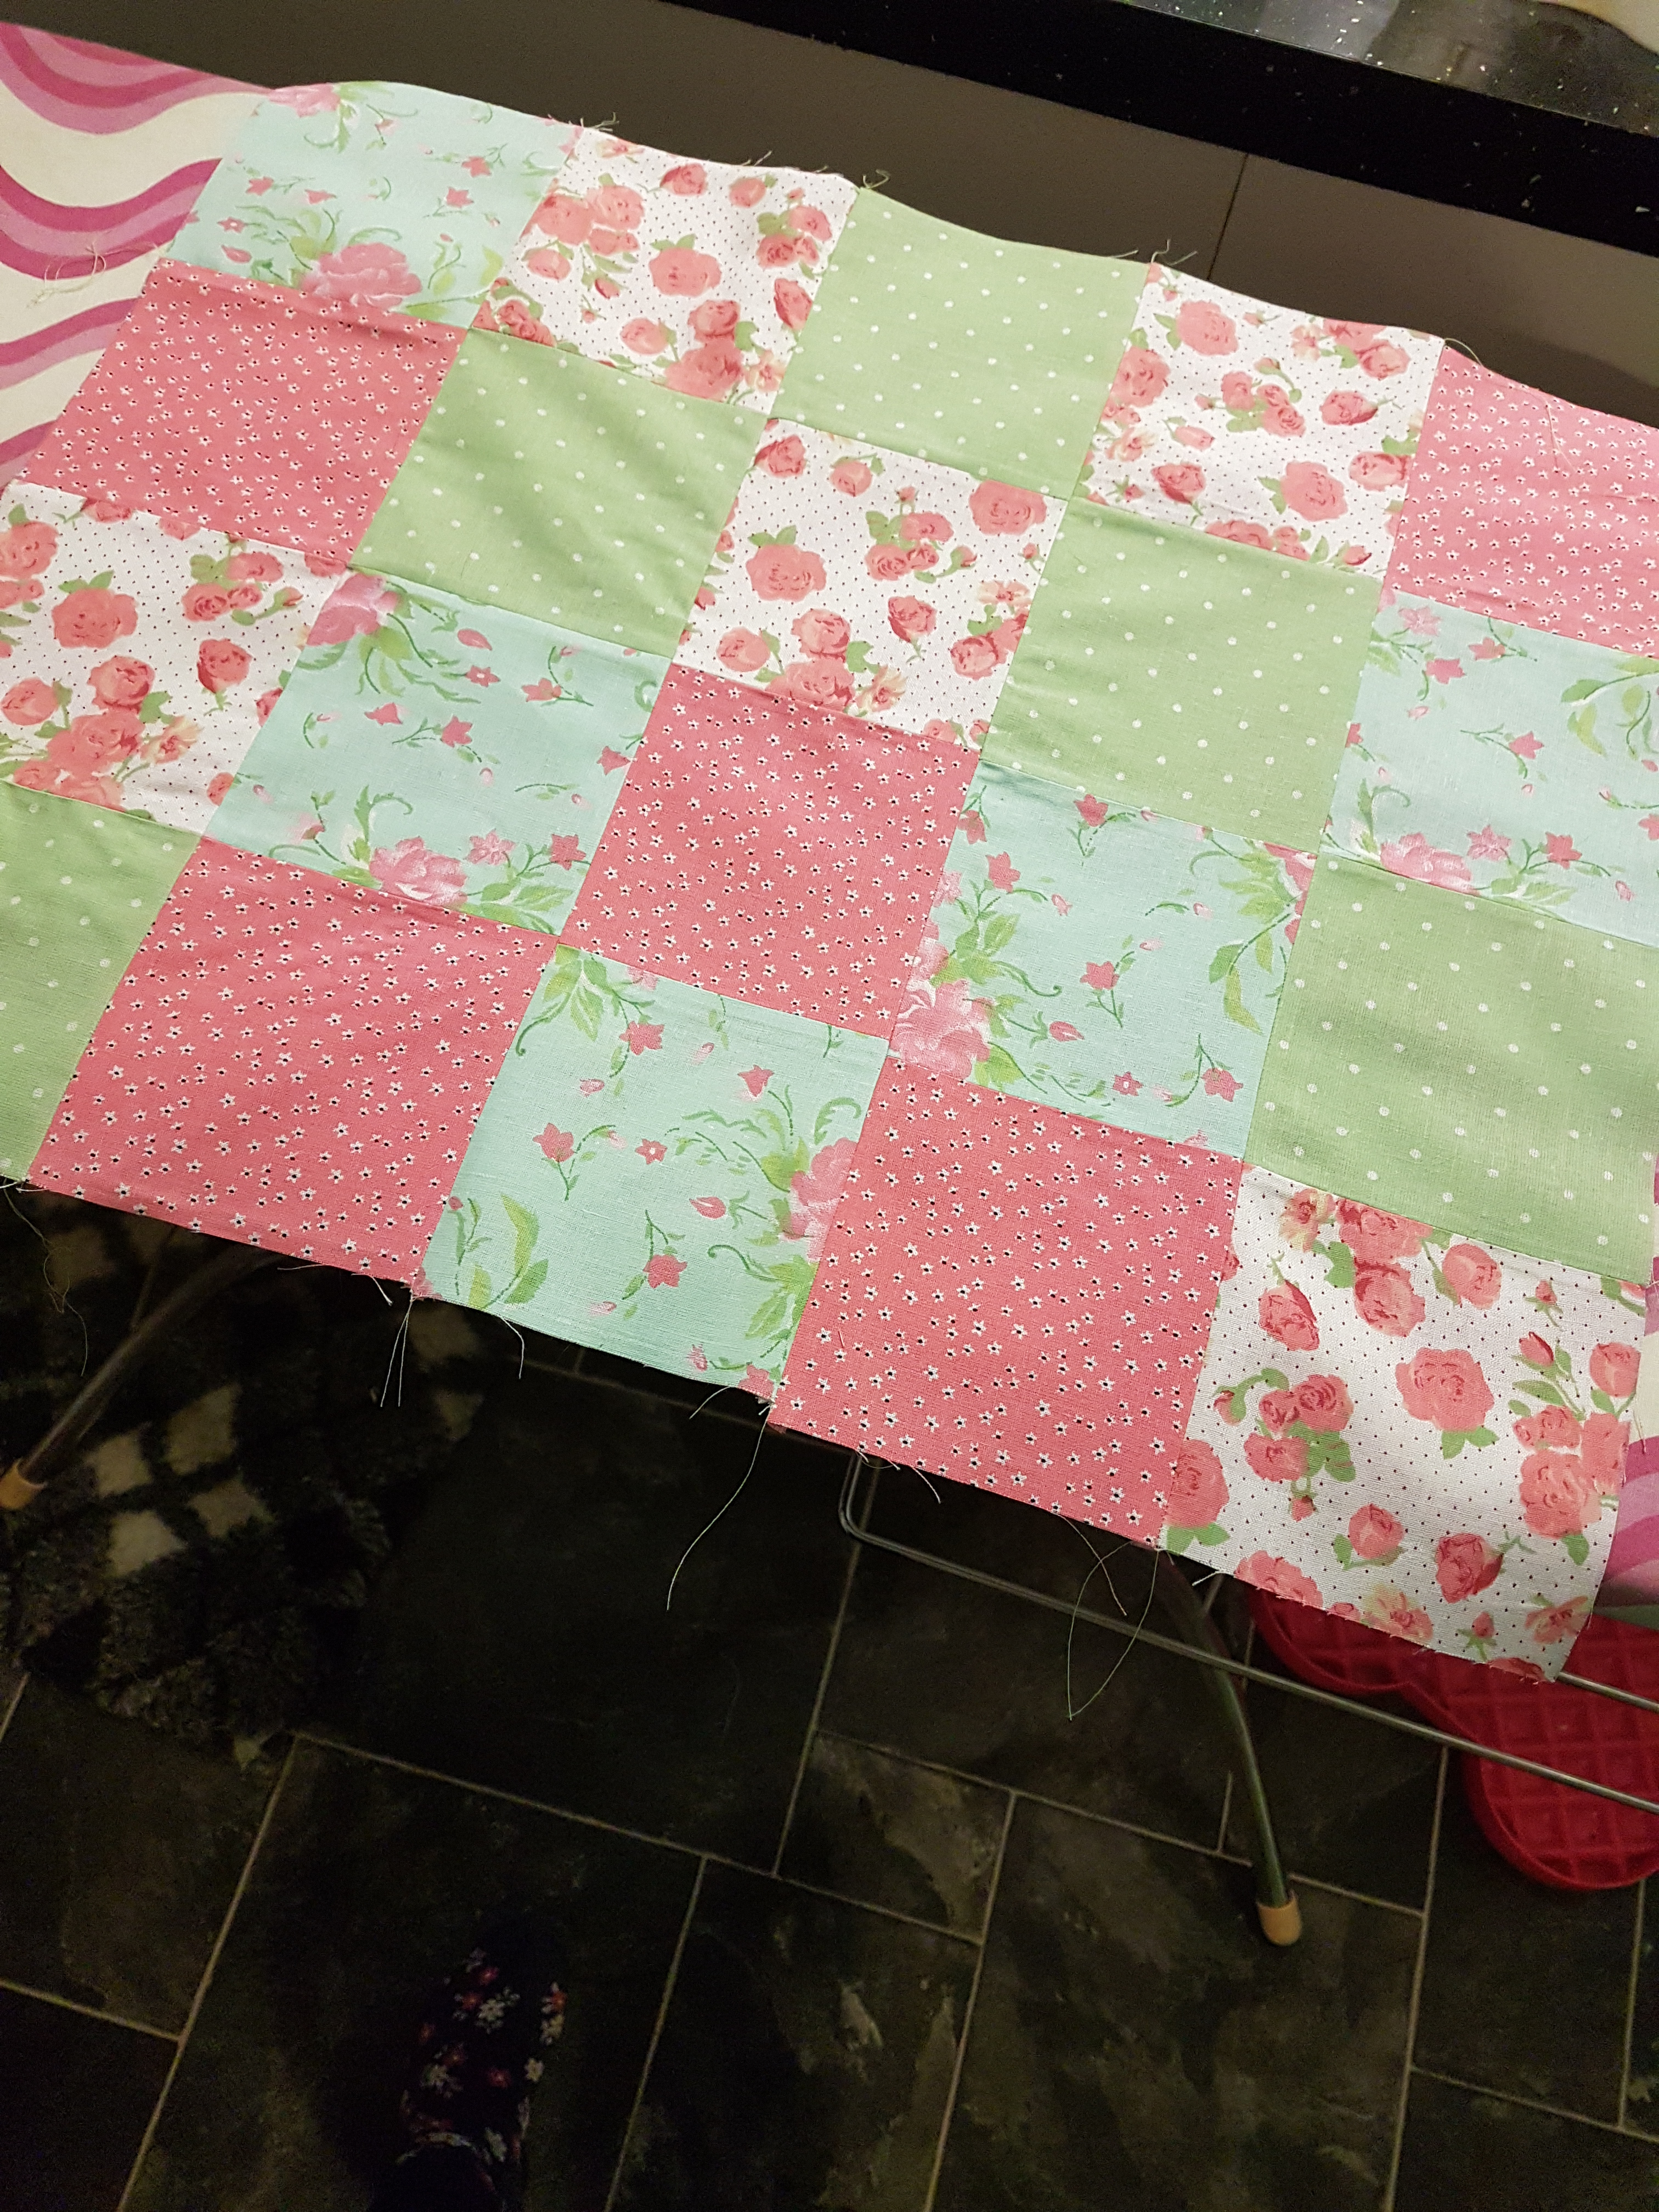
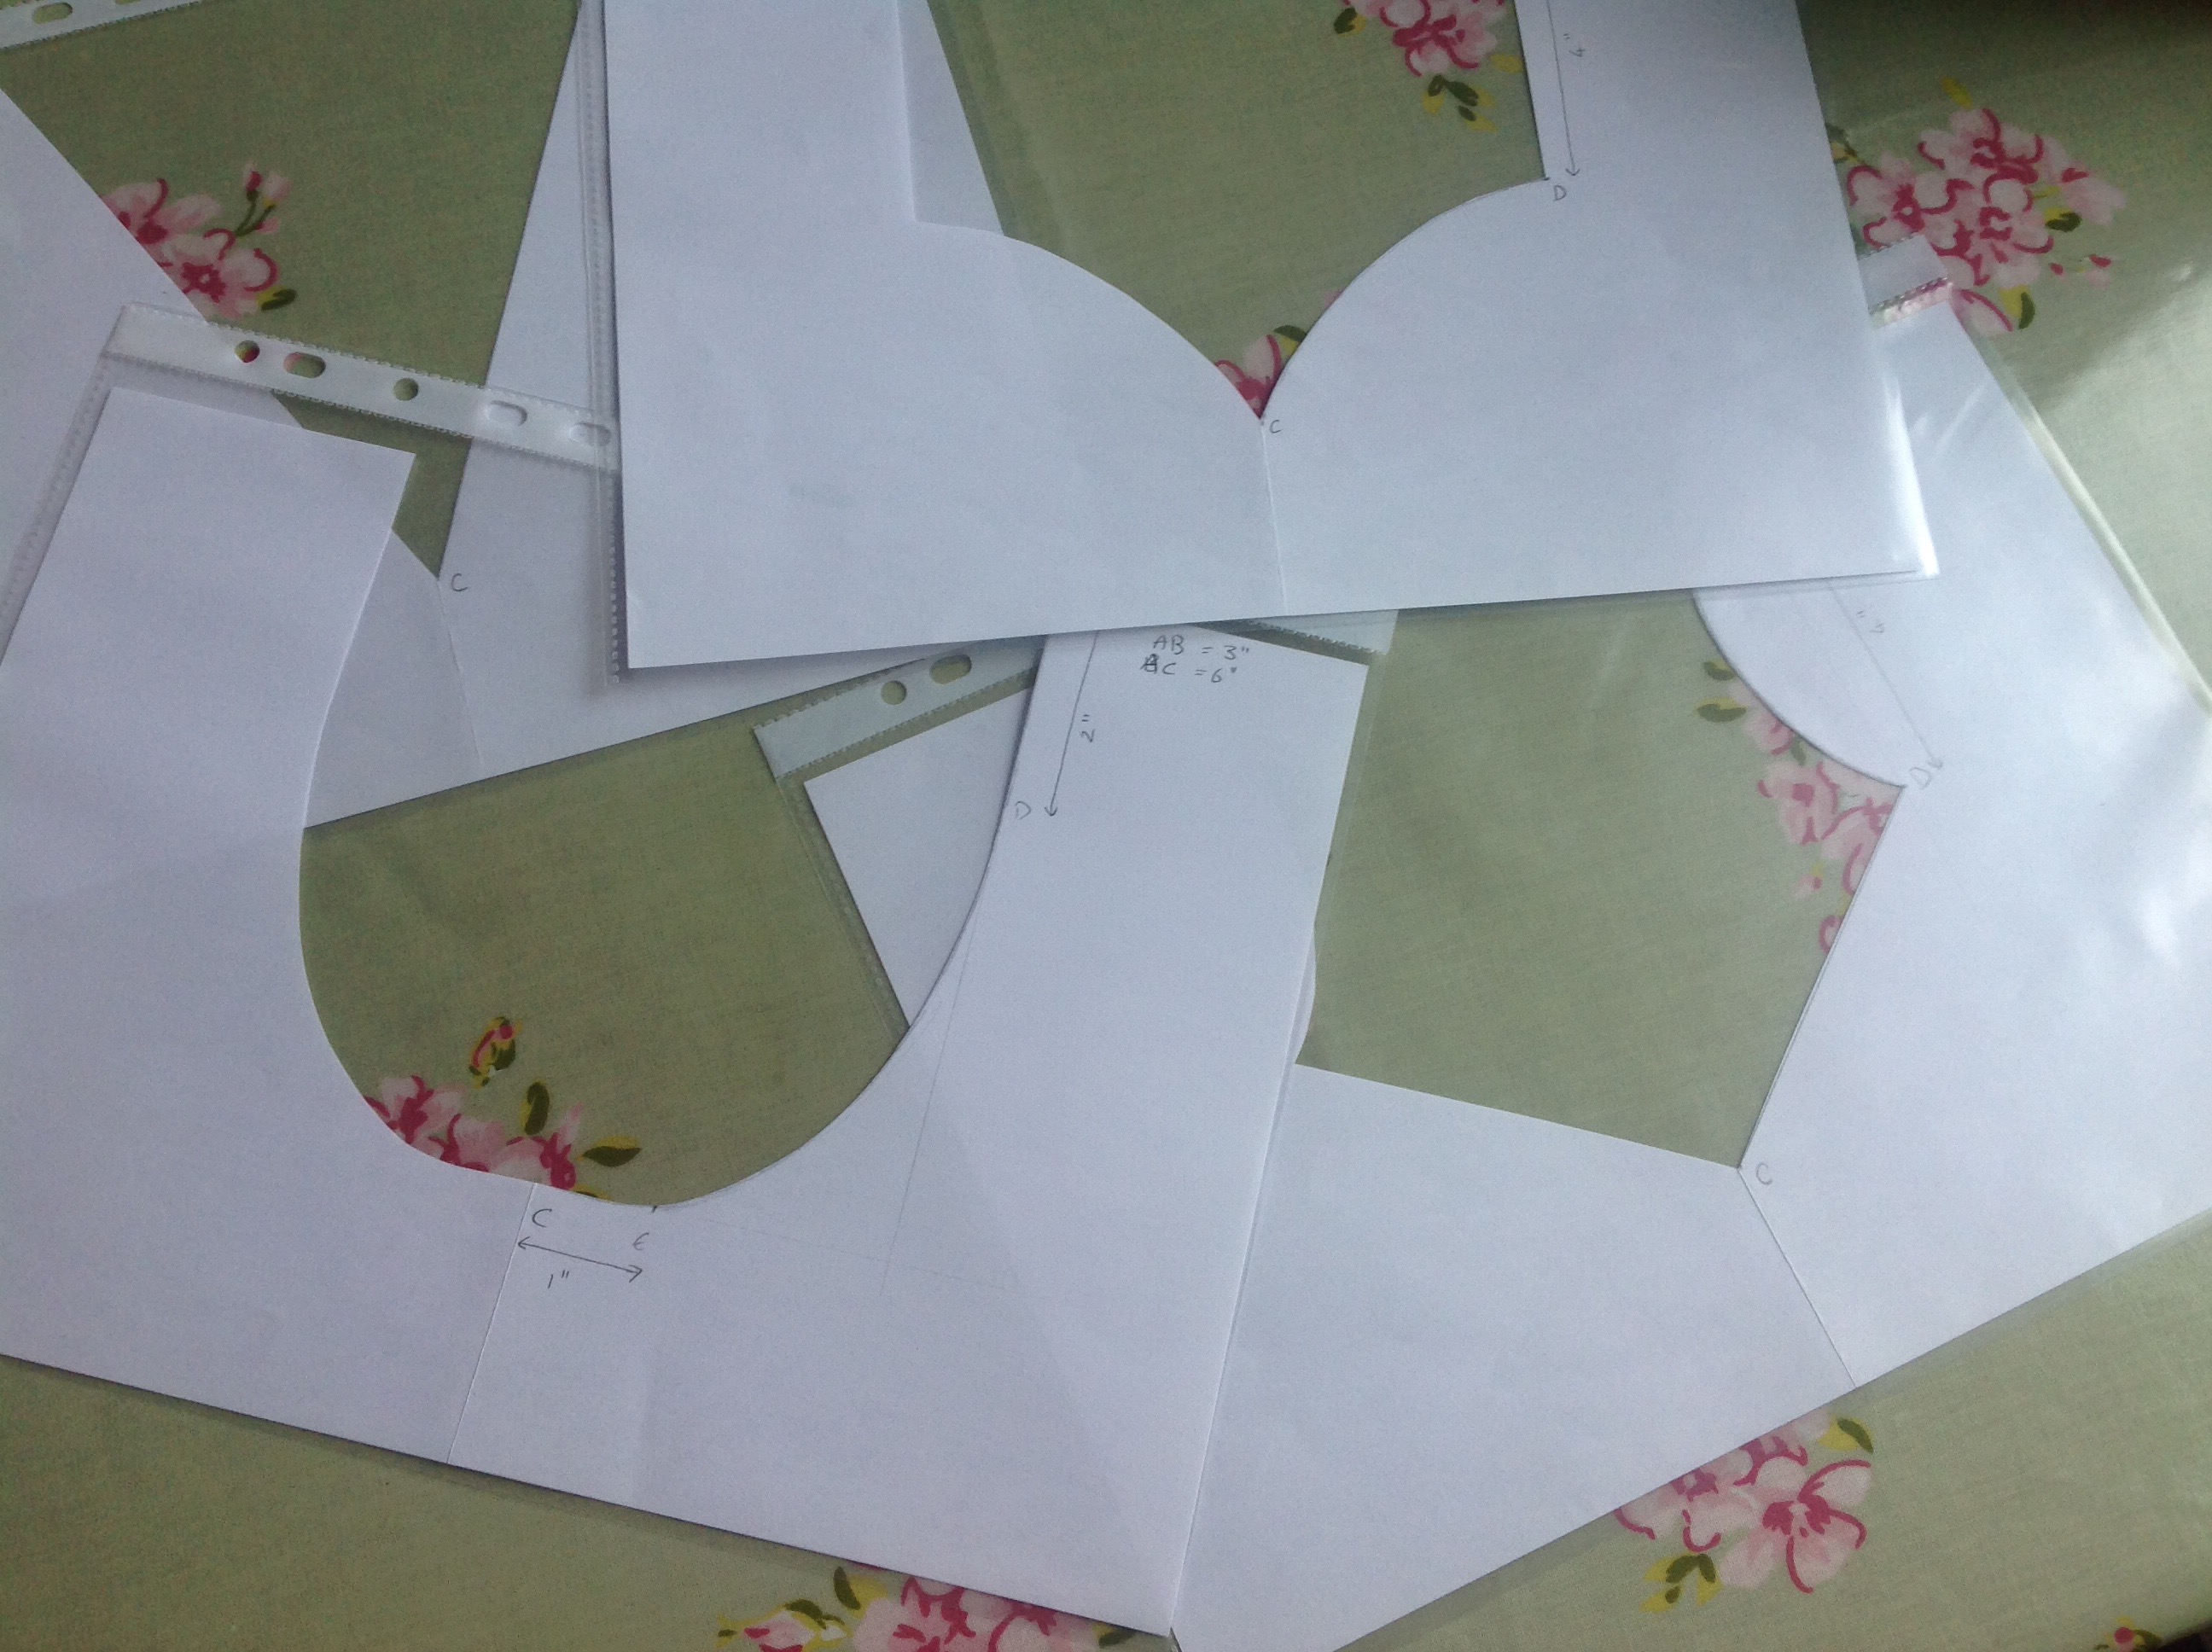
After sifting through various patterns (almost all of them acquired through sewing magazines), I came across a pack of fat quarters I’d picked up from Aldi at some point in the past. Included in the set was instructions for making a patchwork tote bag, complete with lining. Stitching all the squares together would give me plenty of opportunity to practice with my machine again and I had everything I needed to get started. Perfect!

First job – I had to decided which fabrics to use for the outside of the bag and which to keep for the lining. I decided to use the two ginghams for the lining and the others for the outside.

Next job – cutting out. This took far longer than I expected. Who’d have thought 40 11cm squares would take so long..? The instructions included a template but I found it easier (and quicker) to just measure them out. Once everything was cut out, I laid out the squares to decide on a pattern for the sides (or at least one to aim for – more on that later…).


Then it was time for the squares. I decided to do the rows first, then sew the five rows together to make each side. Somehow, despite me laying them all out carefully, I’d managed to put the last row on the first side together wrong. By this point I’d done around four hours at my machine, I was tired, my back hurt & I decided I didn’t really care enough to unlock and re-sew that row – so I just went with it.


At this point I should point out that the sewing didn’t exactly go perfectly… To start off with I couldn’t remember how-to thread my machine or what any of the dials did. After a bit of googling I discovered that I’d actually done the top bobbin correctly and a YouTube video refreshed my memory on how to load my bottom bobbin (thank God for Google!). A bit of trial and error on offcuts and scraps helped me get to grips with the different settings and get my tension right, but that didn’t stop things from getting tangled – repeatedly… I can’t remember how many times I had to take the bottom bobbin out to detangle threads and remove loose threads. But at least rethreading is second nature to me now.

After I’d done both sides, it was time to tackle the straps. These were easy, until it came to turning them inside out. This was not fun. In lieu of knitting needles, I used a metal skewer to push the ends through – as long as I used the round end, this worked well.


Once I’d sewn the two patchwork sides together, and the two lining pieces, it was time to put everything together. When it came to the final construction, I decided not to follow the instructions. Technically, I was supposed to sew the bag & lining together, then attach the straps, I decided to do it all in one go so the ends of the straps would be hidden in the lining. It was fiddly getting everything lined up and pinned together, but I got there in the end.

Once I turned everything the right way out, I realised I’d not quite got the straps right, but I can live with it. I pressed everything and did some top stitching to strengthen the straps a little (some of which is neater than other bits).


Overall, I’m happy with my new bag. Yes it’s not perfect, but it’s all my own work. I’ve rediscovered how much I enjoy sewing and I’ve learnt a few lessons along the way:

  • Preparing properly makes things a lot easier. I was a little relaxed when cutting out my squares so they’re not all exactly the same size.
  • Pressing open seams takes long than you think, especially when there are so many of them!
  • I need to practice sewing in straight lines and controlling my speed – it nearly got away from me a couple of times.

I’m already planning my next project and my machine’s not going anywhere. Plus sewing bee returns soon so watch this space…

Toys and Toddlers

Sorry it’s been so long since  I posted. Life kind of took over and things have been a little chaotic recently (more on that next time).

So no more Sewing Bee!!! How will I last another year until the next series? Much as I loved Jade, I think Charlotte was the right person to win. I can’t wait to see what they’re all going do next.

In the meantime – GBBO is back!! That will keep me occupied for a while – and inspire me to attempt to make cakes, pies, bread and who knows what else… The majority of which will be far better in my head than in reality. Or they’ll be things that only I like the sound of (such as chocolate cupcakes filed with violet butter cream – this will be the year I’m making those). Might not be good for fitting into all those Christmas party dresses in a few months’ time…

So – what have I been doing with myself over the last few months?

Well, my dressmaking course has finished. Unfortunately I missed the last two classes, so I have yet to finish my top. That’s going to be my target over the next month though – all that’s left is to sew the side seams, add a zip so I can actually get it on, hem it and add some sleeves… Easy right? Maybe two months would be a more realistic target and I may need to find a few YouTube tutorials (if anyone has any good recommendations – let me know!).

Although the dressmaking hasn’t quite gone to plan, I have been sewing. I decided to try something different to get me back into using my machine again. Following a request for dinosaur tails for my nieces, I did a bit of hunting and found a wonderful tutorial on Running with Scissors.

Now I have made soft toys before, but I’ve always sewn them by hand. The first toy I made was a toy corgi using one of the Minicraft kits. With all the pieces cut out ready and step by step instructions, even hand-sewing it only took me a few weeks to finish it.

So, when my brother and his wife discovered that they were expecting twins (nearly three years ago now) – I thought “I know what I’ll make them as a present”. I decided to make them a teddy bear each. A bit of googling later and I found the How Joyful Bear free pattern and tutorial.

Knowing that fake fur fabric isn’t suitable for babies, I decided to make the bears out of fleece. Nice, soft and baby safe. What I then realised is trying to draw the pattern on fleece material with tailor’s chalk… really not fun. We ended up having to use a biro and even then it was difficult.

I finished the first bear the weekend the girls were born (the friends I was with that weekend will no doubt remember me frantically embroidering eyes and a nose so that I had it ready to give to the babies the next day). The second bear took a little longer.

Pinky and Perky

Pinky and Perky (Pinky is the spotty one)

Finally, after around 18 months, I was finally able to give them the second bear. Luckily it coincided with the girls discovering soft toys, and Pinky and Perky were happily claimed by the toddlers who were just about big enough to carry them (the first bear was bigger than both the babies put together when they were born).

So, back to the dinosaur tails. As we’re trying to avoid pink at the moment, I decided to do one tail blue with green spikes and one green with blue spikes. They’re nice and soft, and fasten round the waist with Velcro. The girls get their presents this weekend – so I’ll let you know how successful they are.

dinotails

Two home-made dinosaur tails (or dragon tails if you prefer)

I’ve really enjoyed making these and they’ve actually been great for practising my foot control and sewing zigzags. I even got to do some top stitching which is a first. All in all will definitely be making more toys. If nothing else, I think I’ll be making some more dinosaur tails – one for my goddaughter and one for a friend’s nephew.

Toy elephant pattern from Simplicity

Toy elephant pattern from Simplicity

My next project: toy elephants! Having found this pattern on sale, I’ve decided I’m going to make the girls their own toy elephants, complete with cases/bedrooms and a selection of clothes – I can use all the bits of fabric I bought with the aim of doing patchwork and have never actually used. My plan is to do these as Christmas presents, but that might depend on how I get on… I’ll keep you updated.

Update: The girls loved the dino tails! It’s particularly entertaining to watching them wiggle as they charge about. Word of warning though – potty training while wearing a dinosaur tail isn’t ideal…


Sewing Sixties-Style

Last week real life took over a bit, so my review of international week on the sewing bee didn’t really happen. Sorry everyone. But I’m back on track now, so it’s time for Sixties week – sadly without Josh. This year’s sewing bee is now ladies only.

Is anyone else excited by the idea of sewing Sixties-style? There are so many iconic styles from that decade – I can’t wait to see what’s in store for the sewers.

They seem to be looking forward to it as well – although they don’t seem so thrilled at the idea of 1960s sewing machines.

First up is colour-block shift dresses. How on earth can there be 14 pieces in such a simple dress? I recognise the style of dress but I always assumed the blocks were printed rather than it being such a patchwork dress. Obviously I was wrong.

Joyce appears to have learnt her lesson after last week and is following the pattern to the letter. She does seem to have an advantage here having used those machines before, and she seems determined to prove she can follow a pattern exactly.

Personally I really liked Jade’s monochrome block dress. I can see the other colour combinations are striking but just not really my taste. I kind of like Rumana’s pastel blocks as well (anyone who’s seen my house will tell you I like pastels), but I’d have gone with something other than orange.

Am I the only one who loves the little historical snippets each week. I knew a little bit about Sixties fashion from art at school, but I really enjoyed learning more about the Mondrian dress and how it became so widespread. I’m sure there are some lessons for modern-day marketers in there.

The precision demanded of the sewersat this stage is just unreal. I know it’s a competition but I never want to be in a position where anyone is judging my sewing with a ruler.

Incidentally, is anyone else slightly confused by Esme’s outfit this week? It’s very individual but really?

Back to the challenge… A few people seem to have been caught out by the the need for precision here. Jade, Tracey and Rumana all got pulled up on using the wrong colour top stitching. Add to that the trouble people had with that zip and there’s a few in trouble here.

Patchwork patterns done with, we move on to alterations. This week we have PVC raincoats. Well why not?!? Why would anyone want to wear PVC clothing? Friends who have worn PVC (you know who you are), is it as uncomfortable as it looks?

They’re starting to get more daring now with the alterations. Admittedly, working with see through plastic makes anything seem daring, but there’s certainly a lot more variation in what they come up with.

I like Tracey’s target pockets idea, I’ve not seen anything like that before. Having said that, I can see what Esme means about the shape of the dress, but then Tracey doesn’t really seem to do anything fitted. That might trip her up soon if she’s not careful.

Joyce is having a really good week. Top of the pattern challenge and again with her alteration. She’s obviously in her element this week.

This week’s made to measure challenge is jackets. Not just any jackets – they have to use vintage 60s patterns. 

My personal favourite is Charlotte’s Jackie Kennedy-inspired jacket – such a classic shape. Angeline’s orange monstrosity on the other hand… Ok, orange is possibly my least favourite colour so I was never going to love this one, but adding Paisley and faux fur to that? Psychedelic is the right word!

I like the look of Jade’s jacket as well. Not fabric I’d have personally chosen but it’s a lovely style and if she does it well it could be stunning. Let’s hope all that pattern-matching pays off.

Had anyone else ever heard of grown-on sleeves before? I have this bizarre image in my head of some sort of tree with sleeves instead of leaves… I do like that there’s a story behind Tracey’s jacket – it obviously means a lot to her and I hope she’s happy with the end result.

And we’re back to bagging out! This looked bad enough when they were putting the linings on their capes a few weeks ago. Adding sleeves to that? I don’t know how they didn’t end up tied in knots.

Angelline’s really isn’t having a good week. Even taking orange fabric out of the equation her coat’s a mess. It’s not hanging right and her lining’s pulled everything out of shape. I don’t know if she’s done enough to be safe this week. Usually made to measure is her strong point.

Oh no, we have tears! We’ve not even got to the judging yet. Anyone want to join me in giving Tracey and Rumana virtual hugs?

All of Jade’s patience and hard work has paid off. That jacket is lovely, a well-deserved garment of the week.

And we say goodbye to Angeline! I don’t think she was surprised – like we saw with Jamie, she just had an awful week. Can you believe we’ve had five weeks already? There’s so few sewers left now.

So next week we move out to activewear. I’m not sure what that will involve – running gear, yoga tops? I guess we’ll find out next week.

So to sum up Sixties week:

  • I now know how important interfacing is, especially with tailoring
  • I need to start looking out for some vintage patterns – love those jackets
  • I still don’t like orange – not sure that will ever change…

The Dress (part 1)

Over a year ago, I was browsing the craft magazines in WHSmiths (as you do) and in amongst the jewellery-making and patchwork magazines I occasionally treat myself to, I spotted something on the cover of one of the sewing magazines. A dress, one that I’d actually wear. Turns out the dress in question was the free pattern with that edition of Sew Magazine.

The pattern and the fabric i used

The pattern and the fabric I used


Having toyed with the idea of starting to sew – I decided this could be where I start. So I bought it.

I then proceeded to stare at it for quite a while. I read the magazine article and thought – OK, that may as well be written in Greek. It made no sense to me whatsoever. And that was before I even looked at the pattern. Time for some expert help. So next time I went to my parents’, I took it with me.

After looking at the pattern, Mum very confidently told me, “You can make this.” (I’m glad one of us was sure about that). As we’re discussing what sort of fabric I should buy to actually make the dress, she mutters “I may have something…” and vanishes upstairs. She came back down with her arms full of pink floral fabric.

Pink flowery fabric

A close up of the fabric


Turns out she bought this in the 80s and never used it all. It was probably bought with me in mind anyway as she really doesn’t do pink (except for the odd hen do)… So she’s generously donated it to my trial run. (She’s still got masses left so it may reappear in a future project).

After a bit of discussion, she decided version E would be the best one for me to start off with – a straight skirt, pleated neckline and contrast tie-belt.

I never realised how complicated cutting out a pattern was. There was so much to bear in mind – the grain of the fabric, where the fold should be, the right and wrong side of the fabric… I hadn’t realised how important those little diagrams were that show you where to put each pattern piece – now I know better.

Cutting out

Cutting out


Once I’d got everything cut out, I discovered I needed to transfer all these little marks from the paper to the fabric.How do people do this exactly? It’s like trying to trace something only you need to draw on the bottom piece of paper. Thank god she introduced me to tailor tacks – live savers!

All of this took up most of an afternoon, at the end of which I packed everything up again and headed home. it stayed packed up for quite a while.

Eventually I gritted my teeth and got it back out again. Looked at it, read the instructions and decided I didn’t want to do this on my own.

So – back up to my parents, taking all my pattern pieces and my sewing machine. (For those who don’t know, my parents live two hours away, so I can’t just pop round in an evening…)

After reminding (telling) me how to set up and thread my machine, we got started. As my mother’s machine is merrily whirring away (making new covers for my armchair – thank you Mum!), I very slowly, and almost reluctantly, put two darts in the front bodice of my dress. One of them took a couple of attempts to get right, but I did it!

Beginning to feel confident, I then started on the pleats at the neck. This took a while as I had to redo all the dotted lines (did I mention I hate chalk pencils?). However, I now have a pleated neckline. It’s starting to look like it could one day become a piece of clothing.

Deciding I had the hang of it, I moved on to putting darts into the back of the bodice. Meanwhile my mother was looking at my instructions and decided to make a few comments…

So I’m now doing things in a slightly different order, but I’ve been assured this will make adding the zip much easier – if I ever get that far.

My next job on the dress is to start working on the skirt and actually putting pieces together. I’ll let you know how it goes…

Knickers and Negligées

It’s lingerie week on the Great British Sewing Bee. This week the sewers are dealing with delicate fabrics and first up is stretch lace bras.

I can’t imagine sewing your own bra – although I guess it could be handy. I have a few friends who struggle to get bras that fit properly. I’ve had more than one BBQ conversation about the difficulties of finding the right bra (how expensive they are when you find them). When I saw what the sewers were making I thought “maybe I could do this for people…” Having watched this challenge – so not happening!

I love lace but sewing with it? It so delicate and fiddly, adding stretch to that? No thank you. I need to get a lot more experience under my belt before I try anything this complicated.

I think the boys may be at a disadvantage this week. I suspect lingerie isn’t going to be something they’ve made for themselves in the past. Or I could be wrong – maybe they have…

We’re starting to see a bit more of the sewers now They’ve started to settle in.

Tracey’s definitely growing on me this week. I don’t always agree with her taste (that horrific blue top with the lace curtain from week one has stuck with me) but I love her attitude and some of things she’ll say. At some point I’ll figure out who she reminds me of.

Josh is just endearingly honest. Not many blokes would have so openly admitted how little attention they pay to bras. The last few weeks he’s just scraped through, let’s hope he starts to pick up a bit.

Angelline’s been a bit mixed. She seems to do amazing at the things she wants to sew but on this challenge the picot elastic really scuppered her. Wasting all that time unpicking meant she was the only one not to finish her bra. I thought the judges were surprisingly mild given it was held onto the mannequin with pins. Can you imagine Paul Hollywood being that nice to a baker who ran out of time to ice their cake?

Jade’s bra had a few issues too – slightly lopsided and the back looked a bit of a mess. 

Everyone else seemed to do quite well on this challenge, the odd twisted strap aside. The main issues seemed to be with straps and any gathering or pleating they had to do to get it to fit together. Joyce’s did look perfect though.

On to alterations. We saw slightly more variation this week. Maybe they’re starting to get a bit more confident in chopping up items of clothing.

My favourites in this challenge were Angelline’s and Tracey’s camisoles (after dissing Tracey’s taste a few minutes ago). Rumana’s twisted top was an interesting idea but didn’t really work in practice. I’m not entirely sure what Josh was trying to make, but then I’m not sure even he knew. Jamie didn’t have a good challenge either. If his first waistband had fit, it wouldn’t have been so bad, but the stirring elastic really didn’t work. Not up to your usual standard Jamie!

For our final challenge – made to measure luxury robes. I love the made to measure challenges, you really get to see part of the sewers’ personalities. Plus they always make beautiful garments.

So far I’ve loved Angelline’s made to measure items. I want both the skirt from week one and an adult version of that cape. This week she’s done it again – that red robe with the lace and billowing sleeves is just gorgeous.

Jamie, Jamie, Jamie… That robe could have been great, but I think time was just against him (and that fabric). He just tried to do too much and then everything started to go wrong.

Other than Angelline’s, my favourites from this challenge were Jade’s (I agree with Esme on the fabric), Rumana’s and Josh’s. I think he saved himself again with the final challenge. 

For the first time Angelline’s didn’t win garment of the week. I wasn’t surprised Charlotte won, she put so much work into finishing everything perfectly. And the end result was stunning.

No more Jamie! I never saw that coming, I thought he’d be in the final. He took it really well though, he knew he’d had a nightmare week and sometimes that’s all that it takes.

So three down, seven left to sew again. Next week the sewers go international (and apparently Claudia auditions for the Marvel Cinematic Universe). This could be interesting…

P.S. Sewing Top Trumps needs to be a thing!

Summary of week three:

  • Thing’s I’ve learnt:
    • That’s what picot is!
    • Always, always read the pattern
  • New projects to add to the list:
    • Angelline’s dressing gown

Dressmaking or Designing?

In my first post, I mentioned that I recently signed up to a dressmaking course. Over the years I’ve done a few evening courses: creative writing, Italian and even one certificate in modern European history (200 years in 20 weeks – baptism of fire anyone?). This time, I thought I’d go for something a bit more practical.

The course I went with is run by the local council – two hours a week for ten weeks. As I wanted to start sewing anyway, I thought it would be good to have someone keeping an eye on me while I started. I thought we’d go over how to thread and use a machine, then work our way through a few basic projects – making a simple top, maybe an a-line skirt, that sort of thing. Sound logical?

Well apparently not. This course is so much more. We didn’t even touch the machines the first week. Instead we talked about how to measure and cut different necklines. Apparently there are standard measurements for these things – who knew?

So I now have a range of necklines cut out on paper (with the measurements marked) as a reference guide.

A selection of necklines, including v-neck and round necklines

A selection of necklines, including v-neck and round necklines


Turns out we’re not just going to learn how to sew a garment from a pattern, we’re learning how to design garments as well!

Over the last few weeks we’ve been working on a sample – learning and practising the techniques we’ll use when we create a real garment. Here’s my sample so far:

My sample so far showing the front and back necklines

My sample so far

The reverse of my front neckline showing the facing

The reverse of my front neckline


So far we’ve covered:

  • Cutting the front neckline
  • Using iron-on interfacing
  • Sewing on the facing and turning out the neckline
  • Tacking and then blind hemming the neckline
  • Cutting the back neckline
  • Sewing the front and back together
  • Making our own bias binding
  • Sewing on the bias binding

It’s only been five weeks!

This week we did taking measurements and started on sleeves. Rather than measuring ourselves, we had to bring in a dress or top and take measurements from that. These then translate to a rather bewildering diagram for the sleeves. This make sense to anyone?

diagram for cutting out sleeves with lots of letters

Diagram for cutting out sleeves

Not entirely sure how this will become an actual sleeve – but I guess we’ll see.

It may have only been five weeks, but I feel like I’ve learnt so much already. I’m fairly confident now at threading the machine (even if the ones in class are different to mine). I’m also getting better at my foot control, even if my stitching isn’t always as straight as it could be.

As it’s a mixed class, I can see how much progress has been made by those who started just a term before me. They’re now drawing sketches of what they want to make and the tutor talks them through how to make it a reality.

I still feel like a raw beginner most of the time, but I’m beginning to see a light at the end of the tunnel. What I’ve sewn so far may not be perfect, but given how far I’ve come already I’m excited to see what a difference five more weeks will make. 

And who knows, maybe one day I’ll be one of those who can design her own patterns as well as sewing from them. Now there’s something to aim for…